Pages
▼
Monday, August 6, 2012
Start to Finish: Grilled Pizza
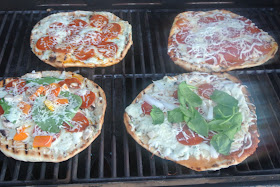
This grilled pizza is so perfect and delicious. It is great for a weekend meal it is quick, easy, and each person can make it exactly how they like it! This is a unique new twist to making pizza and I think it is actually easier! We had company over and everyone loved their grilled pizza. We had two different sauces and so many toppings; there was not one pizza that was the same! It was such a fun way to spend time with friends, the sangria recipe that accompanied this pizza will be coming soon!
Do not let this new way of cooking, I mean grilling, intimidate you. Dough on a grill sounds like a nightmare waiting to happen but, it really is so simple. Once you finally get around to making it, you will be kicking yourself for waiting so long!
I will be making this again and taking more pictures and making a blog entry for each sauce, the dough, and the grilling steps separately soon. I just could not wait to share this delicious recipe with all of you!
Source: The Kitchn
Ingredients for Dough:
3/4 cups of Water, lukewarm
1/2 teaspoon of Active-Dry Yeast
2 cups of Flour
1/2 teaspoon of Salt
Ingredients for Red Sauce:
10 cloves of Garlic, minced
2 tablespoons of Tomato Paste
1 28 oz can of Tomato Puree
1/2 cup of Red Wine
1 cup of Water
1/4 cup of Olive Oil
1 tablespoon of Parsley, fresh and minced
3 tablespoons of Basil, fresh and minced
1 teaspoon of Thyme, dried
1/2 teaspoon of Marjoram, dried
1/2 teaspoon of Pepper
1.5 teaspoons of Salt
Ingredients for White Sauce:
1/2 cup of Ricotta
1/4 cup of Cream
1 tablespoon of Olive Oil
1/4 cup of Italian Parsley, chopped
6 cloves of Garlic, minced
Olive Oil
Salt and Pepper
Directions for Dough:
First, get out a small bowl. Place the lukewarm water in the bowl and add the yeast. Stir it for a second and set it aside for a few minutes to allow the yeast to dissolve.
Now, get out your KitchenAid stand mixer and dough hook. Place the flour and salt into the bowl and combine. Pour in the water and yeast mixture and turn on your stand mixer until well combined.
If you do not have a stand mixer, it is okay! Just place the flour and salt on the counter top, combine the ingredients. Now make a well in the middle of the mixture and pour the yeast mixture there. Combine with your hands and work together until the dough is no longer sticky.
If your dough is still sticky when you touch it, add flour one tablespoon at a time. I added one additional tablespoon of flour to our dough.
Now that your dough is made, separate it into two pieces. Roll it out until it is 1/4 inch thick or less.
This will make enough dough for two personal pizzas. This recipe can easily be doubled.
Directions for Red Sauce:
First, brown the garlic in the olive oil in a saucepan over medium heat until golden brown.
Next, add the tomato paste and fry with the garlic.
Now, add all of the other ingredients and simmer for 5 minutes.
Put the sauce in a blender or processor and puree.
This makes about 5 cups of sauce.
Directions for White Sauce:
First, get out a small bowl. Whisk the ricotta and cream together until well combined.
Now, brown the garlic in a small saucepan with a few tablespoons of olive oil.
After the garlic has browned, add the parsley and cook until wilted.
Next, add this mixture to your small bowl of ricotta and cream, season with a little salt and pepper, and stir all of the ingredients together.
This makes about 3/4 cup of sauce.
Directions for Grilling the Pizza:
First, heat your grill you want it to be as hot as possible.
Next, gather your supplies (toppings and sauces) and set it up right next to the grill.
Now, get your pizza dough. Brush one side with olive oil and place onto the grill. Now brush the other side with olive oil.
When your pizza dough starts to bubble on the top, flip it. Each grill is different depending on the heat. However much time it took to start bubbling is most likely how much time it will need on the opposite side.
As soon as your flip your pizza, add the sauce and toppings. Shut the top of the grill and let it cook. Check the bottom of your pizza with tongs occasionally to make sure it is not burning.
Remove your pizzas with a spatula and eat!
Enjoy!
Happy Cooking,
The Barbee Housewife

No comments:
Post a Comment